Draw Winners
How It Works
The Draw Winners wizard is split into two tabs: Audience and Design.
In the Audience tab you decide who is eligible. In the Design tab you control how the winner announcement looks.
Once both are set, you can preview everything risk-free and then run the real draw.
The design side is very flexible — you can upload your own logo and background image,
pick custom colors, choose from multiple countdown effects, add confetti, and more.
We recommend setting up your design ahead of time and saving it as a template
so it is ready to go when the moment comes.
Ongoing vs Final Draws
There are two ways to draw winners:
- Ongoing — The giveaway stays open after the draw, so you can draw again later. Great for weekly or monthly prizes during a longer campaign.
- Final — The giveaway closes after the draw. Use this for the last prize at the end of a campaign.
You are running a 4-week giveaway and want to award one small prize each week plus a grand prize at the end.
Use Ongoing draws to pick the weekly winners, then switch to Final for the grand prize.
After a Final draw the giveaway is marked as closed and no further draws are possible
— unless you disqualify a winner, which will re-enable the Draw Winners button.
Step 1 – Set Up the Audience
Open your giveaway and click the Draw Winners button to open the wizard.
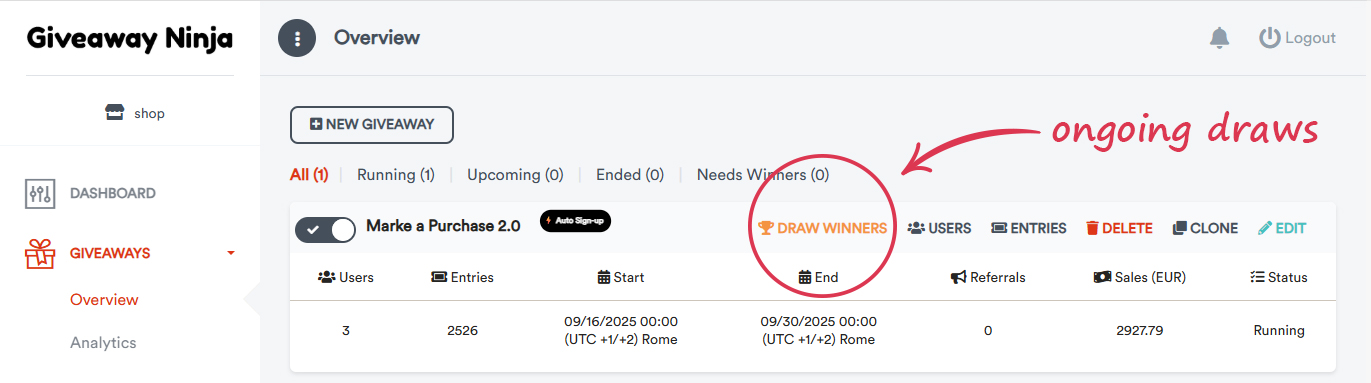
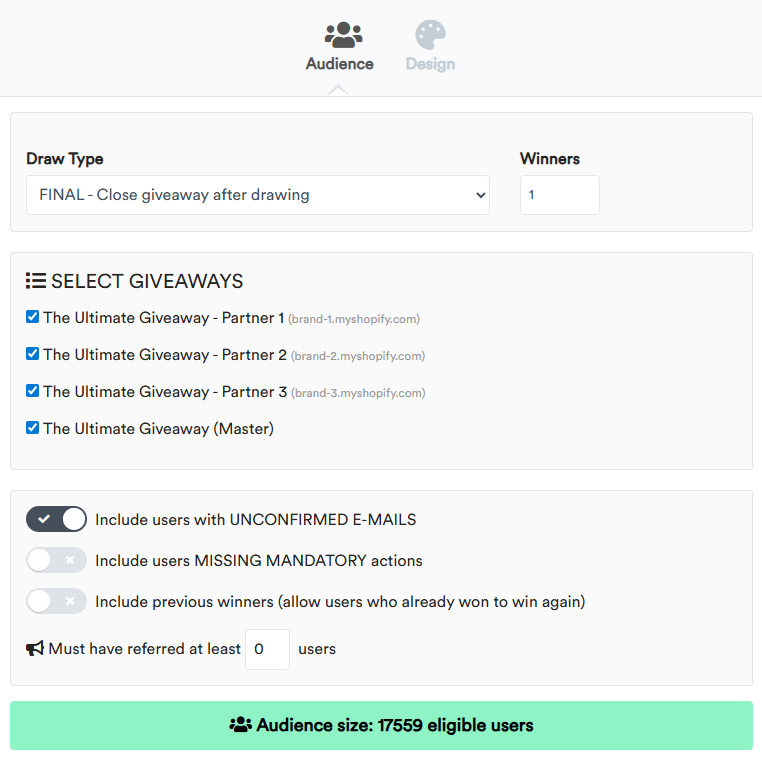
In the Audience tab you will configure:
- Draw Type — Choose between Ongoing or Final (see above).
- Number of Winners — How many winners to pick in this draw.
-
Select Giveaways — Choose which giveaways to include.
If you run multiple giveaways you can combine their audiences into a single draw.
Make sure to disable any expired giveaways you don't want included.
On the Ultimate plan, the giveaway list includes giveaways from all your connected shops.
This lets you merge audiences across multiple sites into a single draw —
perfect for co-branded giveaways run in partnership with other shops.
You also have several filters to fine-tune who is eligible:
- Include users with unconfirmed emails — Turn this on if your giveaway does not require email confirmation, otherwise those users will be excluded.
- Include users missing mandatory actions — Include participants who haven't completed all required entry actions.
- Include previous winners — Allow users who already won in a previous draw to win again.
- Minimum referrals — Only include users who have referred at least a certain number of friends.
At the bottom of the tab you will see the Audience Size indicator.
This tells you exactly how many users are eligible based on your current filters.
If it shows zero, double-check your filter settings before proceeding.
Step 2 – Design the Winner Screen
Switch to the Design tab to customize the full-screen winner announcement
that appears when you draw. Everything here updates in the live preview on the right,
so you can see your changes as you make them.
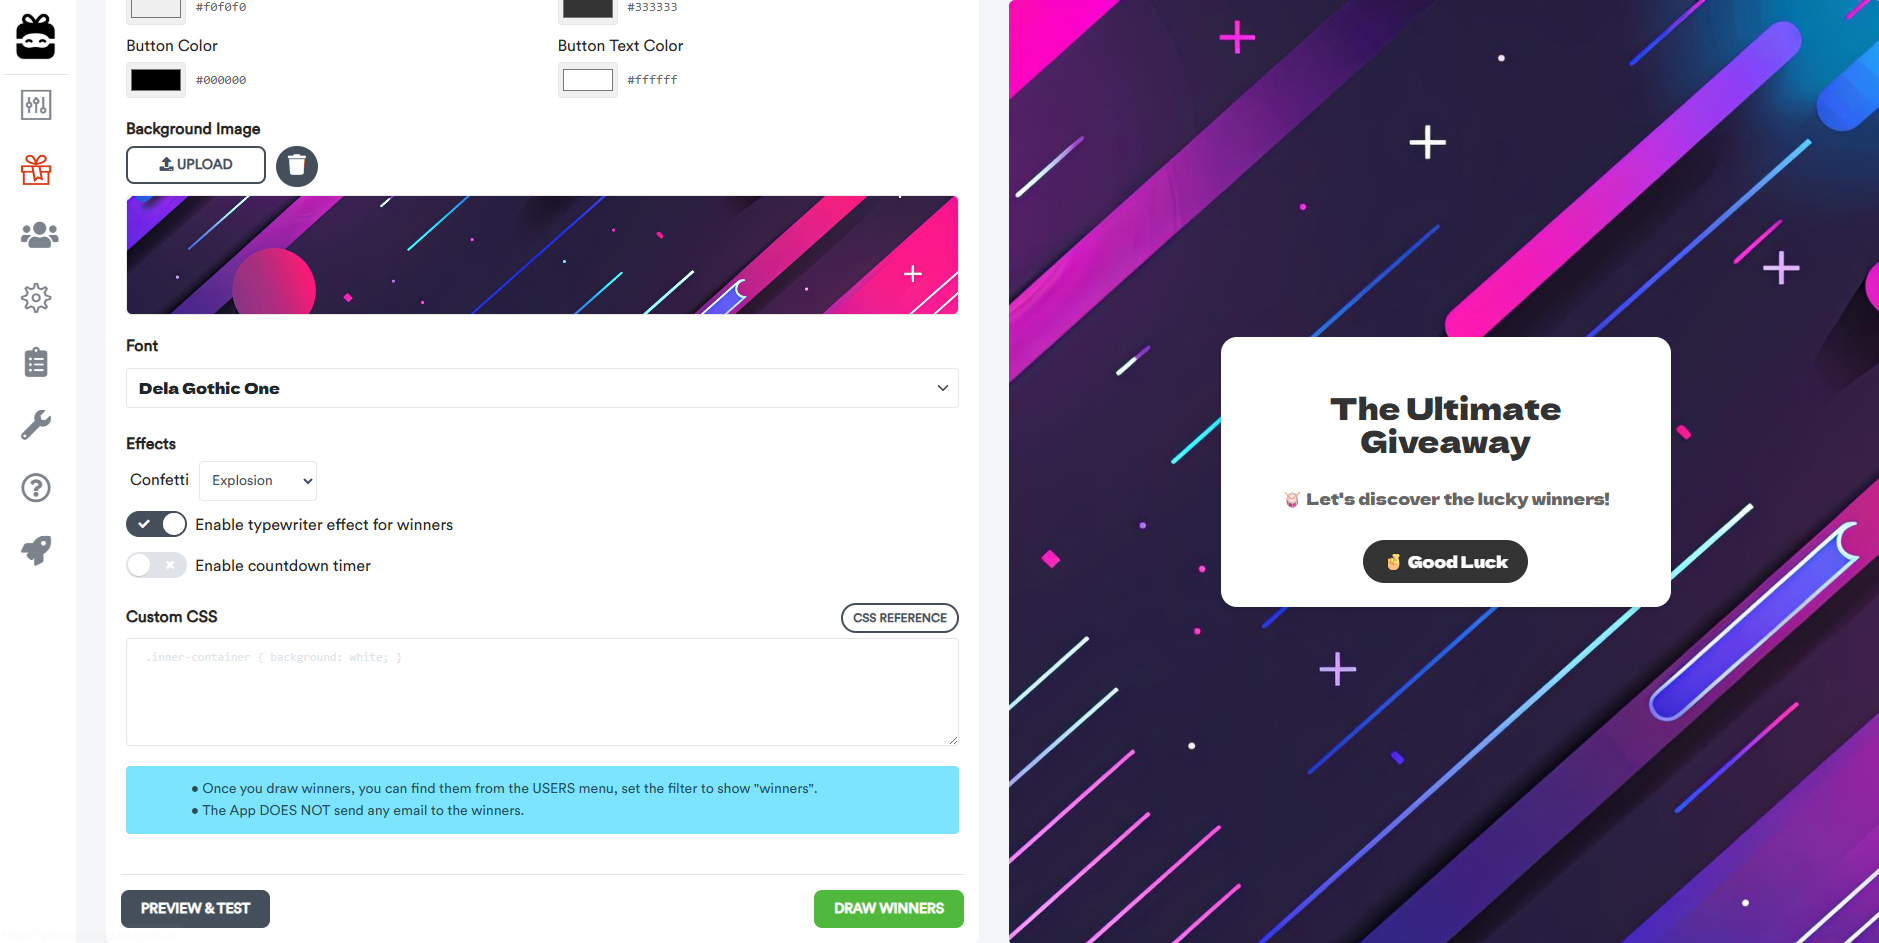
Branding
- Logo — Upload your brand logo (recommended width: 400 px).
- Background Image — Upload an image that fills the entire screen behind the content. Use a high-resolution image for the best result.
Text & Labels
- Header — The main title shown before the draw.
- Description — A short message displayed below the header.
- Pick Winners Button — The label on the button that starts the draw.
- Winners Header — The title shown after winners are picked.
- Winners Names — Choose how winner names are displayed (full name, first name only, masked, etc.).
- Winners List — Optionally show winners as 1st, 2nd, 3rd, etc.
- Winners Description — A message shown below the winners list.
Colors
- Background Color — The solid color behind the content (visible if no background image is set).
- Text Color — The color of all text on the screen.
- Button Color — The background color of the "Pick the Winner" button.
- Button Text Color — The text color inside the button.
Font
Pick any Google Font to match your brand. Leave it empty to use the default font.
Effects
Add some flair to the big reveal:
- Confetti — Choose between an explosion burst or a gentle fall-from-top animation, or disable it entirely.
- Typewriter — Winners' names are typed out one letter at a time for a dramatic reveal.
-
Countdown Timer — A countdown runs before each winner is announced.
You can set the number of seconds, the animation speed, and pick an effect style:
Beat, Slot Machine, Glitch, Blur, 3D Flip, or Elastic Bounce.
Custom CSS
For advanced users: you can write your own CSS to fine-tune any element on the winner screen.
Click CSS Reference to see a list of all available selectors and what they control.
Step 3 – Save Your Design as a Template
Once you are happy with your design, save it as a template using the Save New button
at the top of the Design tab. Give it a descriptive name (e.g. "Holiday Giveaway" or "Weekly Draw - Dark Theme").
Saved templates remember every setting — logo, background image, colors, fonts, effects, and text.
Next time you draw winners, just click Load, pick your template, and everything
is applied instantly. No need to re-configure from scratch.
We recommend creating and configuring your design templates ahead of time, well before the actual draw.
This way, when it is time to pick winners, you simply load the template and you are ready to go.
You can also Update an existing template after making changes, or Reset all settings back to the defaults.
Step 4 – Preview and Test
Before running the real draw, click Test Preview.
This opens the full-screen winner announcement in test mode — you will see a
"Testing" ribbon in the corner so you know nothing is being saved.
Click the "Pick the Winner" button inside the preview to run through the entire experience:
countdown, confetti, typewriter effect, and winner display. This uses real audience data so
you can confirm everything looks and works exactly the way you want.
Always run a test preview before the actual draw. Double-check your colors, text, and effects
on the full screen to make sure everything is perfect — especially if you plan to
record a video of the draw to share on social media.
Step 5 – Draw Winners
When you are ready, click Draw Winners to perform the real draw.
The full-screen announcement will appear with all the effects you configured.
Winners are selected randomly and fairly from the eligible audience.
This is a great moment to record a screen capture and share it on your social media channels!
Step 6 – After the Draw
Once the draw is complete you can review the results:
- Go to Logs > Notifications to see the draw history and winner details.
- Go to the Users tab and filter by "Winners" to see all winners at a glance.
- If needed, you can disqualify a winner and run the draw again to pick a replacement.
DONE
You can now notify the winners and get ready to launch your next giveaway!
NEED HELP? Contact Us